Capturing the dynamic energy of trains in motion is a rewarding pursuit for photographers who want to experiment with creative techniques. Motion blur train photography allows you to convey speed, movement, and atmosphere in a single frame. By intentionally blurring parts of your image, you can transform an ordinary scene into something visually striking, emphasizing the contrast between moving and stationary elements.
This article explores the essential methods, camera settings, and artistic considerations for photographing moving trains with intentional blur. Whether you’re a beginner or looking to refine your approach, you’ll find practical advice and inspiration to help you create compelling images that stand out.
If you’re interested in exploring related creative techniques, our motion blur car light trails tutorial offers additional insights into capturing movement with light and long exposures.
Understanding Motion Blur in Train Photography
At its core, motion blur train photography is about using slower shutter speeds to record the movement of a train as it passes through your frame. The resulting blur can highlight the train’s speed, create a sense of drama, or even turn the vehicle into a streak of color and light. This technique is not just about technical settings—it’s about storytelling, composition, and timing.
When executed well, motion blur can separate your work from standard static shots, drawing the viewer’s eye and evoking emotion. The interplay between sharp and blurred areas in the image can also add depth and context, making your photos more engaging.
Essential Equipment and Preparation
While you don’t need the most advanced gear to start, a few key tools will make the process smoother and more effective:
- Camera with Manual Controls: A DSLR or mirrorless camera that allows you to adjust shutter speed, aperture, and ISO is ideal.
- Sturdy Tripod: Keeping your camera steady is crucial when using slow shutter speeds to avoid unwanted camera shake.
- Remote Shutter Release: This helps minimize vibrations when triggering the shutter, though a self-timer can also work.
- ND Filter (Optional): In bright conditions, a neutral density filter lets you use slower shutter speeds without overexposing your image.
Camera Settings for Capturing Train Motion
The key to successful motion blur train photography is mastering your camera’s exposure controls. Here’s how to set up for the best results:
- Shutter Speed: The most critical setting. For pronounced blur, start with speeds between 1/15 and 1/2 second. The exact value depends on the train’s speed and your creative intent.
- Aperture: Adjust your f-stop to control depth of field and compensate for the slower shutter. A narrower aperture (higher f-number) can help prevent overexposure.
- ISO: Keep ISO as low as possible to reduce noise, especially in low-light conditions.
- Focus: Pre-focus on a spot where the train will pass, or use manual focus to avoid hunting in low light.
For more in-depth technical advice, check out this motion blur photography tutorial that covers the fundamentals of working with moving subjects.
Creative Techniques for Dynamic Train Images
Beyond the basics, there are several creative approaches to enhance your train images with motion blur:
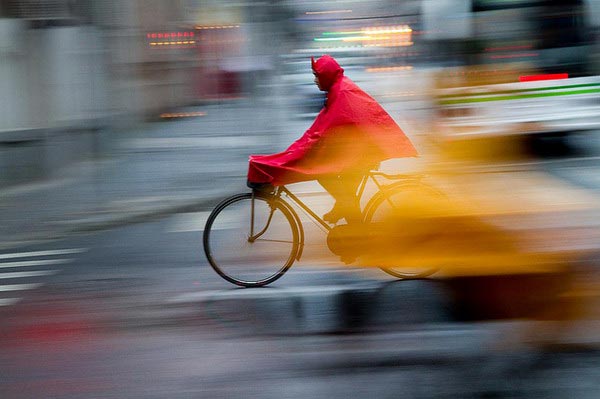
- Panning: Move your camera horizontally to follow the train’s motion during exposure. This keeps the train relatively sharp while blurring the background, emphasizing speed.
- Static Camera: Keep your camera fixed and let the train blur through the frame, turning it into a streak of color or light.
- Foreground Interest: Include stationary objects like platforms, signs, or waiting passengers to provide context and contrast with the moving train.
- Night Shots: Use long exposures at night to capture light trails from train windows or headlights, creating a vibrant, abstract effect.

Timing, Location, and Safety Considerations
Planning is essential for successful train photography with motion blur. Scout your location ahead of time, considering vantage points that offer both safety and a clear view of the tracks. Arrive early to set up and experiment with test shots.
- Timing: Golden hour and blue hour provide beautiful light and often less crowded stations.
- Location: Look for spots with interesting backgrounds or architectural features. Overpasses, platforms, and open countryside all offer unique perspectives.
- Safety: Always stay behind safety lines and follow local regulations. Never trespass on tracks or restricted areas.
For more on the science and perception of movement in images, our article on the connection between motion blur and human vision explores how our eyes interpret blurred motion and why it’s so visually compelling.
Post-Processing Tips for Enhanced Motion Blur
Editing can help you refine your images and accentuate the sense of motion. Here are some post-processing ideas:
- Contrast and Clarity: Boost contrast to make the blurred train stand out against the background.
- Color Grading: Enhance the colors of the train or ambient light for a more dramatic effect.
- Cropping: Adjust your composition to emphasize the direction of movement or remove distractions.
- Selective Sharpening: Apply sharpening to stationary elements to further separate them from the blurred areas.
Remember, subtle adjustments often yield the best results—avoid over-processing, which can introduce noise or artifacts.
Common Challenges and How to Overcome Them
Even experienced photographers encounter obstacles when working with moving trains. Here are some typical issues and solutions:
- Unwanted Camera Shake: Use a tripod and remote release, and enable image stabilization if available.
- Overexposure: Use a smaller aperture, lower ISO, or add an ND filter to control light.
- Missed Focus: Pre-focus on a spot where the train will pass, or use manual focus for consistency.
- Timing the Shot: Practice your timing and take multiple exposures to increase your chances of capturing the perfect moment.
Expanding Your Skills with Related Motion Blur Techniques
Once you’re comfortable with trains, try applying similar blur techniques to other moving subjects. Our motion blur with moving subject tips guide covers a range of scenarios, from cyclists to wildlife. You can also experiment with moving the camera itself during exposure for abstract results, or explore the motion blur effect in graphic design for digital creativity.
Frequently Asked Questions
What shutter speed should I use for motion blur with trains?
The ideal shutter speed depends on the train’s speed and the desired blur effect. For most situations, start with 1/15 to 1/2 second. Faster trains may require even shorter exposures, while slower trains or more dramatic blur might benefit from longer ones. Experiment and review your results to find the right balance.
How can I keep the background sharp while blurring the train?
To achieve a sharp background with a blurred train, use a tripod to stabilize your camera and avoid any movement during the exposure. Focus on a stationary point, and let the train move through the frame at a slower shutter speed. This technique works especially well at stations or with architectural backgrounds.
Is it possible to create motion blur effects in post-processing?
While it’s best to capture real motion blur in-camera for authenticity, you can simulate the effect in editing software using blur filters. However, natural motion blur often looks more convincing and dynamic, as it reflects the actual movement and lighting conditions of the scene.