Understanding motion blur settings for beginners is a key step for anyone looking to capture dynamic, visually striking photos. Whether you’re using a DSLR, mirrorless camera, or even a smartphone, learning how to control blur can transform ordinary shots into compelling images that convey movement and energy. This guide will break down the essential camera settings, practical tips, and common mistakes to avoid, making it easier for newcomers to experiment confidently with motion blur.
If you’re curious about how different adjustments impact your results, you might also find value in exploring motion blur before and after examples for visual comparisons and inspiration.
What Is Motion Blur and Why Use It?
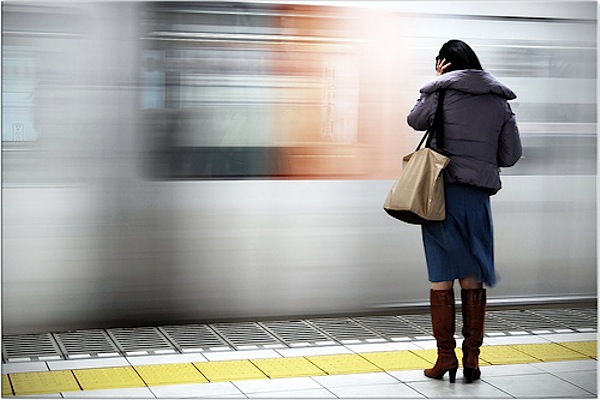
Motion blur refers to the streaking or softening of moving subjects in a photo. It’s created when the camera’s shutter stays open long enough to record movement. While sometimes considered an error, intentional blur can add drama, direction, and a sense of speed to your images. Photographers use this effect in sports, street scenes, nature, and creative portraiture to highlight action or evoke emotion.
Essential Camera Settings for Capturing Motion
To master motion blur settings for beginners, it’s important to understand how your camera’s exposure controls—shutter speed, aperture, and ISO—work together. Here’s a breakdown of the most important settings to adjust:
- Shutter Speed: The most critical factor. Slower speeds (like 1/30s, 1/10s, or even several seconds) allow moving subjects to blur across the frame. The exact speed depends on how fast your subject is moving and how much blur you want.
- Aperture: A smaller aperture (higher f-number) lets in less light, which can help balance exposure when using slow shutter speeds in bright conditions. However, it also increases depth of field, keeping more of the scene in focus.
- ISO: Lower ISO values (such as 100 or 200) reduce sensitivity to light and help minimize noise, which is especially useful for long exposures.
Choosing the Right Shutter Speed for Motion Effects
Selecting the correct shutter speed is the foundation of motion blur photography. Here are some general guidelines for beginners:
- 1/60s to 1/30s: Good for capturing subtle motion, such as people walking or gentle water flow.
- 1/15s to 1/4s: Creates more pronounced blur, ideal for moving vehicles, running animals, or dancers.
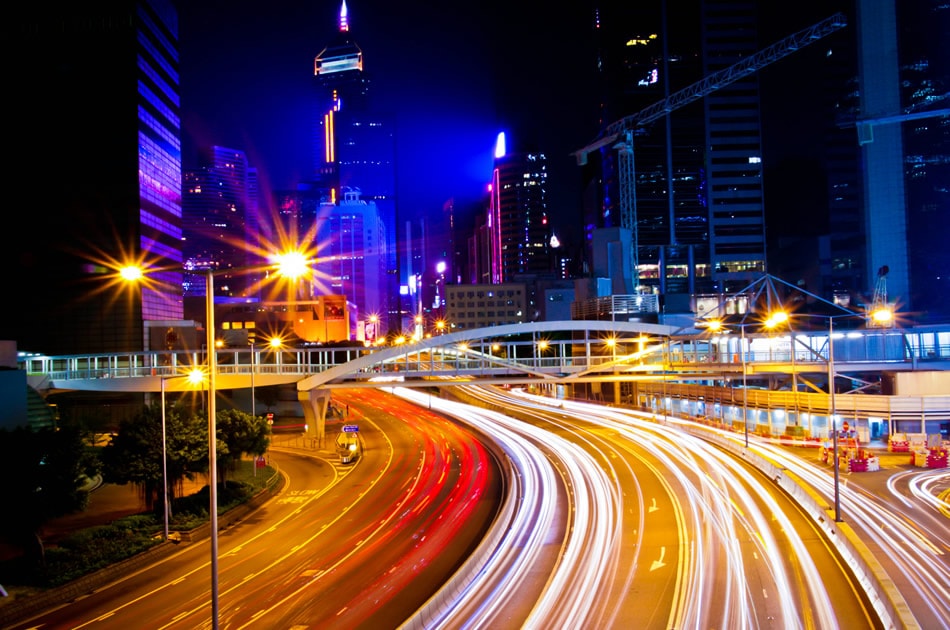
- 1 second or longer: Used for dramatic effects like light trails, waterfalls, or night scenes with moving lights.
Remember, the slower the shutter speed, the more pronounced the blur. If you want only the background or certain elements to show movement, experiment with panning or selective focus.
Practical Tips for Beginners Using Motion Blur
Getting started with motion blur settings for beginners can be straightforward with a few practical strategies:
- Use a Tripod: To keep stationary parts of your image sharp, stabilize your camera with a tripod or a solid surface.
- Try Panning: Move your camera along with the moving subject during exposure. This technique keeps the subject relatively sharp while blurring the background, emphasizing speed.
- Experiment with Light: Shoot during low-light conditions (dusk, dawn, or indoors) to make it easier to use slow shutter speeds without overexposing.
- Use Neutral Density (ND) Filters: In bright daylight, ND filters reduce the amount of light entering the lens, allowing for longer exposures without blowing out highlights.
- Manual or Shutter Priority Mode: Switch your camera to manual (M) or shutter priority (S or Tv) mode to have direct control over shutter speed.
Common Mistakes and How to Avoid Them
Beginners often encounter a few challenges when experimenting with motion blur. Here’s how to address the most frequent issues:
- Unwanted Camera Shake: If the whole image is blurry, it’s likely due to camera movement. Use a tripod, remote shutter release, or your camera’s timer to minimize shake.
- Overexposed Images: Long exposures in bright light can easily lead to blown highlights. Adjust your aperture, lower ISO, or use an ND filter to control exposure.
- Subject Too Blurry: If your subject is completely unrecognizable, try a slightly faster shutter speed or use panning to keep the main subject sharp.
- Autofocus Issues: Cameras may struggle to focus in low light or with fast-moving subjects. Consider pre-focusing on a spot or switching to manual focus.
Creative Ideas for Using Motion Blur
Once you’re comfortable with the basics, try these creative approaches to make your images stand out:
- Light Trails: Capture moving cars or city lights at night to create colorful streaks.
- Flowing Water: Use long exposures to turn rivers and waterfalls into silky, smooth surfaces.
- Urban Movement: Blur crowds or traffic to emphasize the energy of city life. For more ideas, check out these motion blur urban photography techniques.
- Sports and Action: Highlight speed and direction in sports by combining motion blur with sharp subjects.
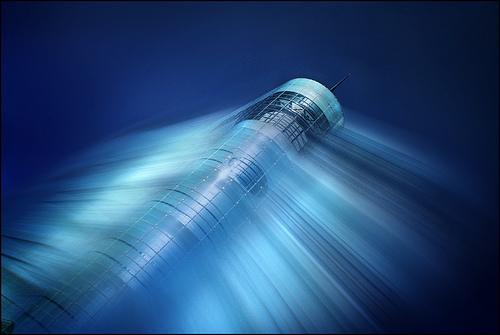
- Abstract Effects: Experiment with zooming or rotating your camera during exposure for unique, artistic results.
Recommended Gear for Better Motion Blur Results
While you can start with any camera, certain equipment can make capturing motion blur easier and more consistent:
- Tripod: Essential for keeping your camera steady during long exposures.
- Remote Shutter Release: Reduces the risk of camera shake when pressing the shutter button.
- ND Filters: Allow for slower shutter speeds in bright conditions.
- Fast Lenses: Lenses with wide apertures (like f/1.8 or f/2.8) provide more flexibility in low light.
For more details on equipment, see these motion blur camera gear recommendations.
Further Learning and Inspiration
To deepen your understanding, consider reading this comprehensive guide to mastering motion blur photography for additional techniques and professional insights.
You can also explore motion blur instagram photography tips and motion blur for social media content to see how creative blur is used across different platforms.
Frequently Asked Questions
What shutter speed should I use to create motion blur?
The ideal shutter speed depends on your subject’s speed and the amount of blur you want. For subtle effects, try 1/60s to 1/30s. For more dramatic blur, use 1/15s or slower. Experimentation is key to finding the right balance.
How can I avoid overexposure when using slow shutter speeds?
To prevent overexposure, use a smaller aperture (higher f-number), lower your ISO, or add a neutral density filter to reduce the light entering your lens. Shooting in lower light conditions also helps.
Do I need a tripod for motion blur photography?
While not always required, a tripod is highly recommended for keeping stationary elements sharp during long exposures. For handheld shots, use image stabilization and faster shutter speeds, or try panning techniques.