
Capturing motion blur on Android camera devices has become a popular way to add energy and creativity to photos. Whether you want to highlight the speed of a moving car, the flow of water, or the hustle of a busy street, mastering this effect can elevate your mobile photography. While many associate motion blur with professional cameras, modern Android smartphones offer plenty of tools and settings to achieve stunning results with just a few adjustments and techniques.
In this article, you’ll learn how to create dynamic blur effects using your Android device, understand the settings that matter, and discover tips for both beginners and enthusiasts. If you’re interested in the differences between blur caused by subject movement and camera shake, check out this detailed explanation of motion blur vs camera shake for further insights.
Understanding Motion Blur in Smartphone Photography
Before diving into the practical steps, it’s helpful to understand what motion blur is and why it occurs. In photography, motion blur happens when a moving subject or camera is captured with a slow shutter speed, causing parts of the image to appear streaked or smeared. This effect can be intentional, adding a sense of speed and movement, or unintentional, resulting in unwanted blur.
On Android devices, achieving this look relies on controlling exposure time and stabilizing your phone. While some default camera apps offer limited manual controls, many third-party apps provide advanced settings to help you fine-tune your shots.
Essential Settings for Creating Motion Blur on Android Devices
To capture effective motion blur with your Android camera, you need to adjust a few key settings. Here’s what to look for:
- Shutter Speed: The most critical factor. A slower shutter speed (e.g., 1/10s, 1/4s, or even 1 second) allows moving subjects to blur across the frame.
- ISO: Lower ISO values reduce noise but require more light. Use the lowest ISO possible for cleaner images.
- Stabilization: To keep static parts of your photo sharp, stabilize your phone using a tripod or by resting it on a steady surface.
- Manual/Pro Mode: Many Android phones include a Pro or Manual mode in the camera app. If not, third-party apps like Camera FV-5 or Open Camera offer manual controls.

Step-by-Step Instructions for Capturing Motion Blur
- Open Your Camera App: Launch the default camera or a third-party app that supports manual controls.
- Switch to Pro/Manual Mode: Look for the Pro or Manual mode, which lets you adjust shutter speed, ISO, and focus.
- Set a Slow Shutter Speed: Choose a slower shutter speed, such as 1/10s or slower. The exact value depends on how fast your subject is moving and the available light.
- Adjust ISO: Set ISO as low as possible to minimize noise. If your image is too dark, increase ISO slightly, but avoid going too high.
- Stabilize Your Phone: Place your Android device on a tripod or steady surface to prevent unintended blur from hand movement.
- Compose and Focus: Frame your shot, tap to focus on a stationary object if possible, and wait for your moving subject to enter the frame.
- Take the Photo: Press the shutter button gently to avoid shaking the device. Some apps offer a timer or remote shutter to further reduce movement.
- Review and Adjust: Check your photo. If the blur is too strong or weak, adjust the shutter speed and try again.
Creative Ideas for Using Motion Blur Effects
Once you’ve mastered the basics, experiment with different scenarios to make the most of motion blur on Android camera devices:
- Traffic Trails: Capture light trails from cars at night by using a long exposure.
- Waterfalls and Rivers: Slow shutter speeds can make flowing water appear silky and smooth.
- Sports and Action: Show the speed of athletes or moving animals by blurring their motion against a sharp background.
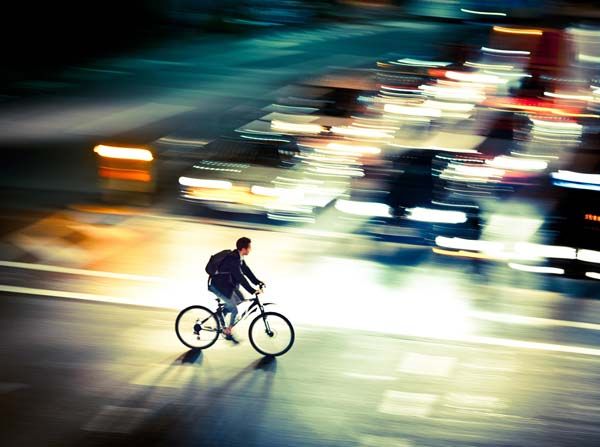
- Street Photography: Convey the energy of a busy street by blurring people or vehicles while keeping buildings sharp.
Tips for Improving Your Motion Blur Photos
- Use a Tripod: Even slight hand movement can ruin your shot. A tripod or phone holder is essential for sharp backgrounds.
- Shoot in Low Light: Lower light conditions naturally require slower shutter speeds, making it easier to achieve blur effects.
- Experiment with Angles: Try panning your camera to follow a moving subject, which keeps the subject sharp while blurring the background.
- Edit Carefully: Use photo editing apps to enhance contrast and color, but avoid over-sharpening, which can make blur look unnatural.
- Practice: The more you experiment, the better you’ll understand how different settings affect your results.
Common Challenges and How to Overcome Them
Achieving the perfect motion blur with Android devices can be tricky. Here are some common issues and solutions:
- Too Much Blur: If everything in your photo is blurry, your shutter speed may be too slow or your phone moved during the shot. Use a faster shutter speed or stabilize your device better.
- Not Enough Blur: If the effect is too subtle, try a slower shutter speed or choose a subject that moves faster.
- Overexposed Images: Long exposures in bright light can result in washed-out photos. Use a neutral density (ND) filter attachment for your phone or shoot in lower light.
- Noise: High ISO settings can introduce grain. Always start with the lowest ISO possible and increase only as needed.
Further Learning and Resources
For those who want to deepen their understanding, there are many excellent resources available. A comprehensive tutorial on how to use motion blur creatively in photography provides additional techniques and inspiration for both mobile and traditional cameras.
If you’re interested in how vision inspection and automation are transforming industries, you might also find value in exploring topics like the importance of industrial vision inspection and factory machine learning applications explained.
Frequently Asked Questions
Can I achieve motion blur effects without a tripod?
While it’s possible to create blur effects by holding your phone steady against a solid surface, a tripod or phone holder is highly recommended. This minimizes camera shake and ensures that only the moving subjects are blurred, not the entire image.
Which Android camera apps are best for manual controls?
Many Android phones have built-in Pro or Manual modes. If yours doesn’t, popular third-party apps like Camera FV-5, Open Camera, and ProCam X offer extensive manual settings, including shutter speed adjustments essential for motion blur photography.
What’s the difference between motion blur and camera shake?
Motion blur occurs when a moving subject is captured with a slow shutter speed, resulting in streaks or trails. Camera shake, on the other hand, happens when the camera itself moves during the exposure, causing the entire image to blur. For a detailed comparison, see this guide on motion blur vs camera shake.
How can I avoid overexposed photos when using slow shutter speeds?
To prevent overexposure, shoot in low light conditions or use a neutral density (ND) filter made for smartphones. Lowering the ISO and adjusting the aperture (if your device allows) can also help control brightness during long exposures.