Capturing motion blur in photography is a creative technique that transforms ordinary scenes into dynamic images full of energy and movement. Whether you’re photographing flowing water, bustling city streets, or athletes in action, understanding the right camera settings is essential. This guide provides a practical overview of the most important settings, tips, and considerations for achieving beautiful motion blur effects, making it a valuable reference for both beginners and experienced photographers.
Before diving into the specifics, it’s helpful to understand how motion blur differs from other types of image softness. For a deeper comparison, see our resource on motion blur vs camera shake, which clarifies the distinction and helps prevent common mistakes.
Understanding Motion Blur in Photography
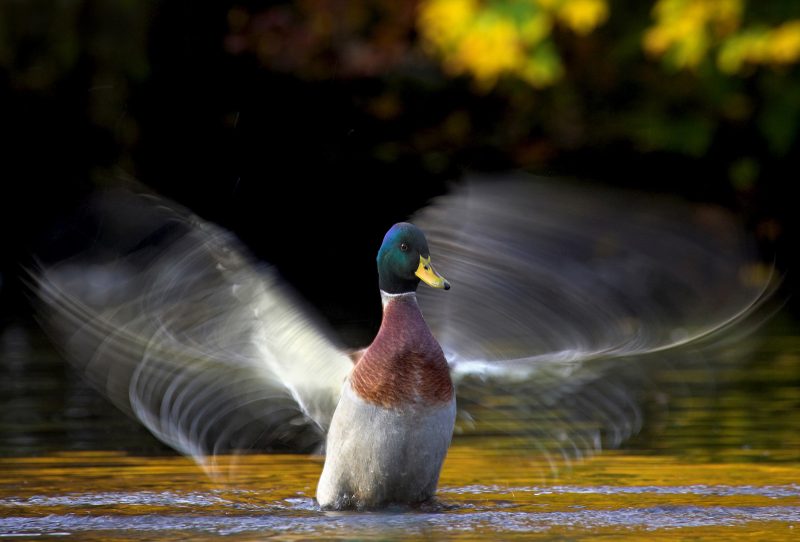
Motion blur occurs when moving subjects are captured with a slow enough shutter speed that their movement is recorded as streaks or trails. This effect can add a sense of speed, direction, or atmosphere to your images. The key to mastering this technique lies in knowing which camera settings to adjust and how each one influences the final result.
Essential Camera Settings for Motion Blur Effects
To create intentional blur, you’ll need to balance several camera settings. The following sections break down the most important adjustments, forming a practical motion blur camera settings cheat sheet for quick reference.
Shutter Speed: The Foundation of Motion Blur
The most critical setting for capturing movement is shutter speed. A slower shutter allows more time for moving subjects to travel across the sensor, resulting in visible blur. Here are some general guidelines:
- 1/30s – 1/2s: Good for moderate blur, such as people walking or gentle water flow.
- 1/2s – 2s: Ideal for strong blur in fast-moving scenes, like traffic at night or waterfalls.
- 2s and longer: Used for dramatic effects, such as light trails or smoothing out ocean waves.
Remember, the exact speed needed depends on your subject’s movement and the effect you want to achieve.

Aperture and ISO: Supporting Roles
When using slow shutter speeds, you’ll often need to compensate with your aperture and ISO settings to avoid overexposing your image:
- Aperture: Use a smaller aperture (higher f-number, such as f/8–f/16) to reduce the amount of light entering the lens. This helps maintain correct exposure and increases depth of field, keeping more of the scene in focus.
- ISO: Set your ISO as low as possible (ISO 100 or 200) to minimize noise and allow for longer exposures without blowing out highlights.
Adjust these settings in tandem with your shutter speed to achieve the desired blur without sacrificing image quality.
Stabilization: Keeping the Camera Steady
Since slow shutter speeds can introduce unwanted camera shake, it’s important to stabilize your camera. Use a sturdy tripod, or place your camera on a solid surface. If your lens or camera body offers image stabilization, enable it—but remember that for exposures longer than a second, some photographers prefer to turn stabilization off to prevent micro-vibrations.
Quick Reference: Motion Blur Settings Table
| Scene Type | Recommended Shutter Speed | Aperture Range | ISO |
|---|---|---|---|
| Flowing Water | 1/4s – 2s | f/8 – f/16 | 100–200 |
| City Traffic | 1s – 10s | f/8 – f/22 | 100 |
| Sports (Panning) | 1/30s – 1/125s | f/4 – f/8 | 100–400 |
| People Walking | 1/15s – 1/2s | f/8 – f/16 | 100–200 |
Creative Techniques for Dynamic Blur
Beyond the basic settings, there are several creative approaches to enhance your motion blur images:
- Panning: Move your camera in sync with a moving subject using a slower shutter speed. This keeps the subject relatively sharp while blurring the background, emphasizing speed and direction.
- Zoom Blur: Twist the zoom ring during exposure to create radial blur effects, drawing the viewer’s eye into the frame.
- Intentional Camera Movement (ICM): Deliberately move the camera in a specific direction while exposing to create abstract, painterly results.

Lighting Conditions and Filters
Achieving the right amount of blur in bright conditions can be challenging. When there’s too much light, even the smallest aperture and lowest ISO might not allow for slow enough shutter speeds. In these cases, consider using a neutral density (ND) filter to reduce the light entering the lens, enabling longer exposures without overexposing your image.
Early morning, late afternoon, or overcast days are often ideal for experimenting with blur, as the lower light levels naturally allow for slower shutter speeds.
Common Mistakes and How to Avoid Them
- Unwanted Camera Shake: Always use a tripod or stable surface for exposures longer than 1/30s to keep stationary elements sharp.
- Overexposure: Double-check your histogram and use ND filters when necessary to prevent blown highlights.
- Incorrect Focus: Pre-focus on your subject before switching to manual focus, especially in low light or when using filters.
- Ignoring Composition: Even with creative blur, pay attention to framing, leading lines, and subject placement for compelling images.
Further Learning and Resources
For more in-depth techniques and inspiration, check out this comprehensive guide to motion blur photography. Expanding your knowledge will help you refine your skills and experiment with new creative approaches.
Frequently Asked Questions
What is the best shutter speed for motion blur?
The ideal shutter speed depends on your subject’s speed and the effect you want. For subtle blur, try 1/30s to 1/2s. For more dramatic effects, use 1s or longer. Experiment with different speeds to see what works best for your scene.
Do I need a tripod for motion blur photography?
A tripod is highly recommended for slow shutter speeds to prevent unwanted camera shake, especially when you want stationary elements to remain sharp. For panning shots, a tripod with a panning head can help, but handheld techniques are also common.
How can I achieve motion blur in bright daylight?
In bright conditions, use a small aperture (high f-number), the lowest ISO, and consider adding a neutral density (ND) filter to reduce light. This allows for slower shutter speeds without overexposing your image.
Is there a difference between motion blur and camera shake?
Yes, motion blur is the intentional recording of subject movement, while camera shake is unintentional blur caused by camera movement. For a detailed explanation, refer to our article on motion blur vs camera shake.
Mastering the art of capturing movement with your camera opens up new creative possibilities. Use this guide as a reference whenever you want to add energy and life to your images with intentional blur. With practice and experimentation, you’ll discover your own favorite techniques and settings.