Achieving the right look with motion blur ISO settings is a balancing act that every photographer faces, whether capturing light trails at night or panning with fast-moving subjects in daylight. ISO, shutter speed, and aperture all interact to create the desired blur effect, but ISO is often the least understood of the trio. Knowing how to adjust it for different lighting conditions and creative goals can make the difference between a muddy, noisy image and a crisp, visually compelling shot.
In this article, we’ll break down how ISO influences motion blur, how to select the right values for various scenarios, and what pitfalls to avoid. If you’re looking for creative inspiration or want to see real-world examples, you might also enjoy exploring motion blur composition examples for additional ideas.
Understanding the Role of ISO in Motion Blur
ISO controls your camera sensor’s sensitivity to light. When you increase ISO, the sensor becomes more sensitive, allowing you to shoot in lower light or use faster shutter speeds. However, higher ISO values also introduce more digital noise, which can reduce image quality.
For motion blur ISO settings, the goal is to find an ISO value that lets you use a slow enough shutter speed to capture blur, but not so high that noise overwhelms your image. In bright conditions, you can keep ISO low and use a small aperture to allow for longer exposures. In dim settings, you may need to raise ISO, but only as much as necessary.
Choosing the Right ISO for Different Motion Blur Effects
The ideal ISO setting depends on your subject, lighting, and the effect you want to achieve. Here are some common scenarios:
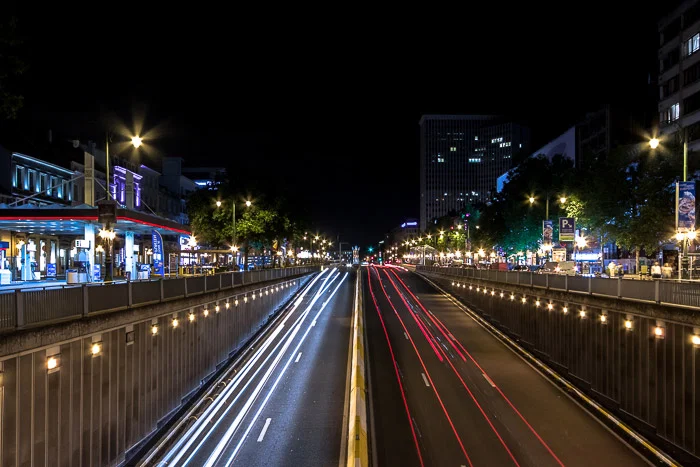
- Daylight Light Trails: Use the lowest native ISO (often ISO 100 or 200). Pair with a narrow aperture (like f/16) and a neutral density filter if needed, so you can use a slow shutter speed without overexposing.
- Low-Light or Night Photography: Start with a moderate ISO (400–800). This gives you more sensitivity to light, allowing longer exposures without excessive noise. For very dark scenes, you might push ISO higher, but be mindful of noise.
- Indoor or Event Motion Blur: Indoors, light is often limited. ISO 800–1600 is common, but modern cameras can handle even higher values with acceptable results. Always check your camera’s noise performance at different ISOs.

Balancing ISO, Shutter Speed, and Aperture for Creative Blur
The exposure triangle—ISO, shutter speed, and aperture—works together to control how motion blur appears. Here’s how to approach the balance:
- Set Your Desired Shutter Speed: Decide how much blur you want. For silky water or light trails, you may need exposures of several seconds. For panning shots, 1/30s to 1/125s often works.
- Adjust Aperture: Use a smaller aperture (higher f-number) to limit light if your shutter speed is slow. This also increases depth of field, which can help keep more of the scene in focus.
- Fine-Tune ISO: Raise ISO only if you can’t get the right exposure with shutter speed and aperture alone. The lower the ISO, the cleaner your image will be.
For those just starting out, the motion blur settings for beginners guide offers a step-by-step approach to mastering these basics.
Common Mistakes with ISO and Motion Blur
Even experienced photographers can run into issues when setting ISO for motion blur. Here are some pitfalls to watch for:
- Using Too High an ISO: This can introduce noise and reduce dynamic range, especially in shadow areas. Always use the lowest ISO that gives you the exposure you need.
- Forgetting to Check Exposure: Relying on auto ISO can sometimes push sensitivity too high. Always review your histogram and adjust manually if needed.
- Ignoring the Impact of Aperture: A wide aperture lets in more light but reduces depth of field, which may not be ideal for all motion blur effects.

Advanced Tips for Mastering ISO in Motion Blur Photography
Once you’re comfortable with the basics, try these advanced strategies to refine your results:
- Use Manual ISO: Take control by setting ISO manually, especially in changing light. This prevents the camera from unexpectedly raising sensitivity and adding noise.
- Bracket Exposures: Shoot a series of images at different ISO values to compare noise and blur. This helps you find the sweet spot for your camera and scene.
- Leverage In-Camera Noise Reduction: Many cameras offer long exposure noise reduction. Enable this for exposures longer than a second to reduce hot pixels and color noise.
- Shoot in RAW: RAW files retain more detail and allow for better noise reduction in post-processing.
For a deeper dive into creative techniques, check out this comprehensive guide to mastering motion blur photography that covers both technical and artistic approaches.
Comparing ISO Settings: Before and After
Seeing the difference ISO makes can be eye-opening. Comparing images shot at low versus high ISO, especially in motion blur scenarios, highlights the trade-offs between noise and exposure flexibility. For practical examples, the motion blur before and after examples guide provides side-by-side comparisons to help you judge the impact for yourself.
FAQ: Motion Blur and ISO Choices
What ISO should I use for motion blur in daylight?
In bright conditions, use the lowest native ISO your camera offers (typically ISO 100 or 200). This lets you use slower shutter speeds for motion blur without overexposing. If you still need longer exposures, consider using a neutral density filter to reduce the amount of light entering the lens.
How does ISO affect the quality of motion blur photos?
Higher ISO increases sensor sensitivity but also adds noise, which can make motion blur images look grainy or reduce color fidelity. Keeping ISO as low as possible helps maintain image quality, especially in areas of smooth blur or shadow.
Can I use Auto ISO for motion blur photography?
Auto ISO can be useful, but it may prioritize exposure over creative intent, sometimes raising ISO higher than necessary and introducing unwanted noise. For the most control, set ISO manually, especially when you want a specific blur effect.
Conclusion: Finding Your Ideal Motion Blur ISO Settings
Mastering motion blur ISO settings is about understanding how sensitivity, exposure, and creative goals interact. By starting with the lowest possible ISO, adjusting your shutter speed for the desired blur, and fine-tuning aperture, you can consistently achieve clean, dynamic images. Don’t be afraid to experiment—every scene is different, and practice is the best way to learn how ISO choices affect your results.
For more inspiration and practical advice, you might also enjoy the motion blur cinematic photography guide or discover tips for sharing your work with motion blur Instagram photography tips.