

Capturing motion blur in photography is a creative way to convey movement, energy, and emotion in your images. Whether you’re photographing bustling city streets, flowing water, or dynamic sports scenes, using a structured approach ensures you get the results you want. This guide provides a comprehensive motion blur photography checklist for shooters, covering preparation, camera settings, and practical tips to help you master this technique.
Before diving into the technical details, it’s helpful to explore different creative approaches. For inspiration and practical examples, check out these motion blur composition examples that showcase how artists use blur to enhance storytelling and visual impact.
Why Use a Checklist for Motion Blur Shots?
A well-structured checklist helps photographers avoid common mistakes and ensures all technical and creative elements are considered before pressing the shutter. By following a step-by-step process, you can consistently produce sharp, expressive images with intentional blur, rather than accidental camera shake or missed focus.
Essential Gear for Motion Blur Photography
Having the right equipment is the foundation of successful motion blur images. Here’s what you’ll need:
- Camera with Manual Controls: Allows you to adjust shutter speed, aperture, and ISO precisely.
- Sturdy Tripod: Essential for keeping the camera steady during longer exposures.
- Remote Shutter Release or Timer: Minimizes camera shake when triggering the shutter.
- Neutral Density (ND) Filters: Useful for achieving slower shutter speeds in bright conditions.
- Lens Hood: Reduces lens flare and protects your lens during outdoor shoots.
Pre-Shoot Preparation: Planning for Success
Preparation is key to capturing compelling motion blur. Consider the following before heading out:
- Scout Your Location: Identify interesting subjects and backgrounds that will benefit from motion blur.
- Check the Weather and Lighting: Overcast days or golden hour often provide ideal conditions for longer exposures.
- Visualize the Movement: Decide whether you want to blur the subject, the background, or both.
- Pack Extra Batteries and Memory Cards: Long exposures and multiple attempts can drain your resources quickly.
Camera Settings for Creative Motion Blur
Choosing the right camera settings is crucial for achieving the desired blur effect. Use this checklist to dial in your settings:
- Shutter Speed: The most important factor. For visible blur, start with speeds between 1/15 and several seconds, depending on the subject’s speed.
- Aperture: Adjust to control depth of field and compensate for exposure. A smaller aperture (higher f-number) lets you use slower shutter speeds in brighter light.
- ISO: Keep ISO as low as possible to reduce noise, especially for long exposures.
- Focus Mode: Use manual focus or pre-focus on the spot where the action will occur to avoid hunting during exposure.
- Image Stabilization: Turn off if using a tripod to prevent unintended movement.
For more detailed advice on setting up your camera, the motion blur settings for beginners guide provides step-by-step instructions tailored for newcomers.
Techniques to Enhance Motion Blur Effects
There are several ways to creatively use blur in your photos. Here are some proven techniques:
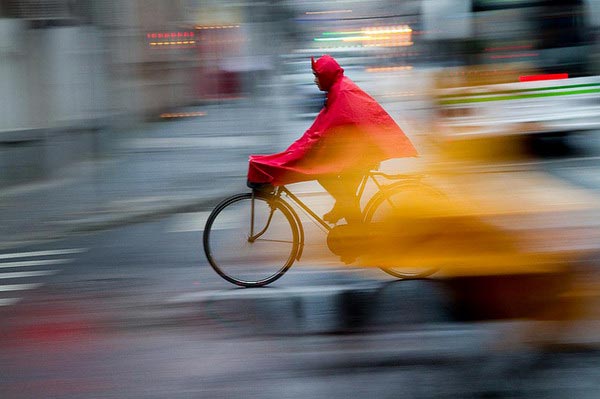
- Panning: Move the camera along with a moving subject using a slow shutter speed. This keeps the subject relatively sharp while blurring the background.
- Static Camera, Moving Subject: Keep the camera still and let the subject move through the frame for classic blur trails.
- Intentional Camera Movement (ICM): Move the camera during exposure for abstract effects.
- Zoom Burst: Zoom in or out during a long exposure to create dynamic radial blur.

On-Site Checklist: Steps to Follow During the Shoot
- Set up your tripod and compose your shot.
- Attach any necessary filters (ND or polarizer) to control light and reflections.
- Switch to manual mode and dial in your planned shutter speed, aperture, and ISO.
- Pre-focus on your subject or the area where the action will occur.
- Take a test shot and review the histogram to check exposure.
- Adjust settings as needed for the desired blur and exposure balance.
- Use a remote shutter release or timer to minimize vibration.
- Capture multiple frames to increase your chances of getting the perfect shot.
- Review images on your camera’s LCD, zooming in to check sharpness and blur quality.
Post-Processing Tips for Motion Blur Images
Editing can enhance your motion blur photos by improving contrast, color, and sharpness in key areas. Here’s what to consider:
- Adjust Exposure and Contrast: Fine-tune brightness and contrast to make the blur stand out.
- Selective Sharpening: Apply sharpening only to the subject or focal point to emphasize clarity.
- Noise Reduction: Use noise reduction tools, especially for long exposures taken at night.
- Cropping and Straightening: Refine composition and remove distractions from the edges.
For more creative ideas and before-and-after transformations, explore the motion blur before and after examples guide.
Common Mistakes and How to Avoid Them
Even experienced photographers can run into issues when working with motion blur. Here are some pitfalls to watch out for:
- Unintentional Camera Shake: Always use a tripod and remote release for exposures longer than 1/30 second.
- Overexposure: Use ND filters or shoot during low light to prevent blown highlights.
- Missed Focus: Pre-focus and use manual focus to ensure your subject is sharp where needed.
- Not Enough Blur: Experiment with slower shutter speeds until you achieve the desired effect.
Further Learning and Resources
If you want to dive deeper into the art and science of capturing movement, this in-depth tutorial on motion blur techniques covers advanced tips, creative inspiration, and troubleshooting advice for all skill levels.
You can also find more creative ideas in the motion blur creative inspiration article, which highlights unique approaches and artistic uses of blur in photography.
FAQ: Motion Blur Photography
What shutter speed should I use for motion blur?
The ideal shutter speed depends on your subject and the amount of blur you want. For slow-moving subjects, try 1/15 to 1/4 second. For fast action, experiment with 1/60 to 1/8 second. Longer exposures (several seconds) work well for light trails or flowing water.
How do I avoid unwanted camera shake?
Use a sturdy tripod and a remote shutter release or the camera’s self-timer. Turn off image stabilization when using a tripod, and avoid touching the camera during exposure.
Can I create motion blur in bright daylight?
Yes, but you’ll likely need a neutral density (ND) filter to reduce the amount of light entering the lens. This allows you to use slower shutter speeds without overexposing your image.
Is post-processing necessary for motion blur photos?
While not mandatory, editing can enhance the final image by improving exposure, contrast, and sharpness in selected areas. It’s especially useful for reducing noise in long exposures.
Where can I find more examples and inspiration?
Browse the motion blur cinematic photography guide for curated galleries and expert tips on using blur for dramatic effect.