Capturing motion blur in photography is a creative way to convey movement, energy, and the passage of time within a single frame. Whether you want to show the rush of city traffic, the flow of water, or the dynamic action of sports, mastering this technique can add a new dimension to your images. This guide will walk you through the essential steps, gear, and camera settings needed to achieve beautiful blurred motion effects, even if you’re just starting out.
Before diving into the technical process, it’s helpful to see how others have approached this style. For inspiration and practical ideas, check out these motion blur composition examples that showcase a variety of creative approaches.
Understanding Motion Blur and Its Creative Uses
Motion blur occurs when a moving subject or camera causes parts of an image to appear streaked or smeared. This effect is achieved by using a slower shutter speed, allowing the sensor to record movement over time. Photographers use this technique to:
- Emphasize speed and direction
- Create a sense of atmosphere or mood
- Highlight a subject against a blurred background
- Add abstract or artistic qualities to a scene
Common subjects for this style include flowing water, moving vehicles, dancers, athletes, and bustling crowds. The key is to control the amount and direction of blur to match your creative vision.
Essential Gear for Capturing Blurred Motion
While you can experiment with motion blur using almost any camera, certain equipment will make the process easier and more consistent:
- Camera with manual controls: A DSLR or mirrorless camera that lets you adjust shutter speed is ideal.
- Tripod: Stabilizes your camera to prevent unwanted shake, especially for long exposures.
- Neutral Density (ND) filter: Reduces the amount of light entering the lens, allowing for slower shutter speeds even in bright conditions.
- Remote shutter release or self-timer: Minimizes camera movement when pressing the shutter button.
While not strictly required, these tools help you achieve sharper results and more creative control.

Step-by-Step Guide: How to Create Motion Blur
Follow these steps to start producing compelling images with intentional blur:
1. Choose the Right Scene and Subject
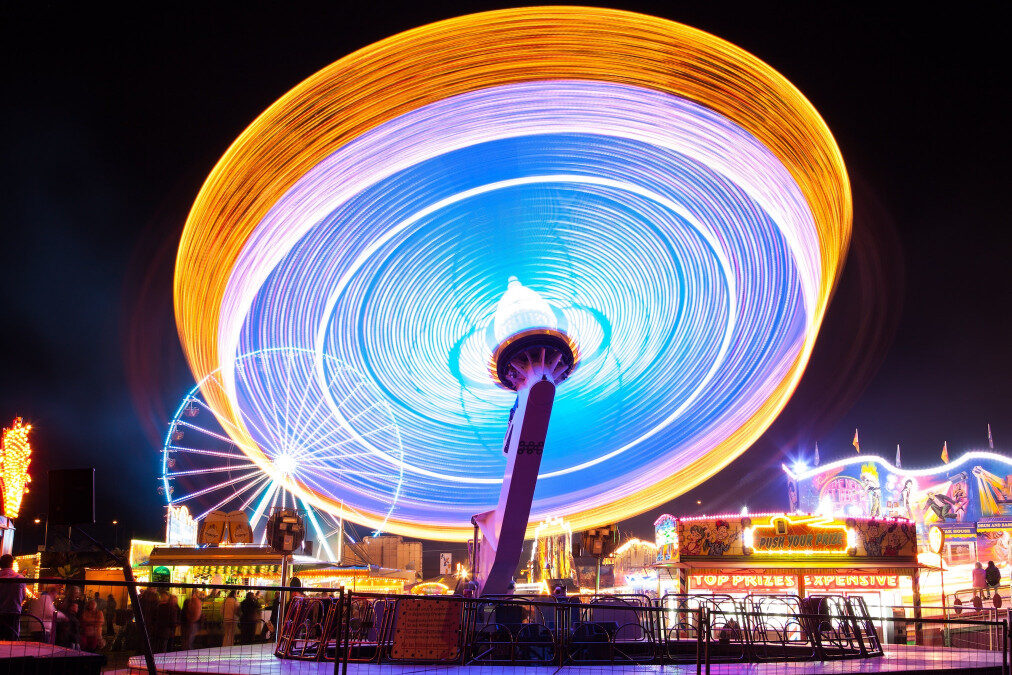
Look for situations where movement is a key element. Flowing rivers, busy streets, amusement parks, or sporting events all offer excellent opportunities. Think about whether you want the entire scene to be blurred or just a specific subject.
2. Set Up Your Camera and Stabilize
Mount your camera on a tripod to keep stationary elements sharp. If you don’t have a tripod, try resting your camera on a stable surface. Attach an ND filter if you’re shooting in bright daylight and need to slow your shutter speed further.
3. Adjust Camera Settings for Motion Blur
- Shooting mode: Switch to Shutter Priority (S or Tv) or Manual (M) mode.
- Shutter speed: Start with a slower shutter speed, such as 1/30s to several seconds, depending on the speed of your subject. Faster subjects require shorter exposures, while slower movement benefits from longer ones.
- Aperture: Use a smaller aperture (higher f-number) to control exposure and increase depth of field.
- ISO: Set ISO as low as possible to reduce noise and avoid overexposure.
Take test shots and review the results, adjusting your shutter speed until you achieve the desired amount of blur.
4. Focus and Compose Your Shot
Decide whether you want your subject sharp against a blurred background (using panning) or the entire scene to show movement. Use manual focus if your camera struggles to lock onto moving subjects. Compose your frame to lead the viewer’s eye through the motion.
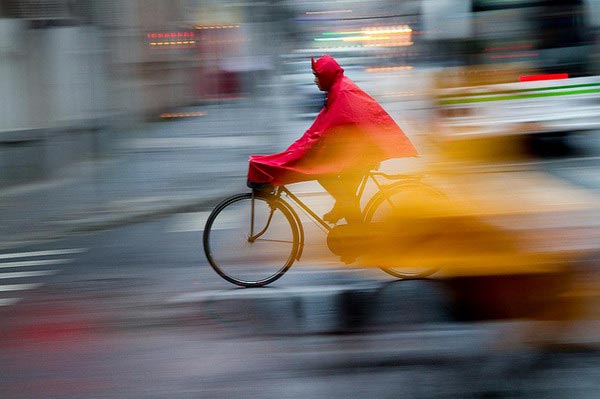
5. Experiment with Panning Techniques
Panning involves moving your camera in sync with a moving subject during the exposure. This keeps the subject relatively sharp while blurring the background, emphasizing speed and direction. To try panning:
- Set a shutter speed between 1/15s and 1/60s.
- Follow your subject smoothly as it moves across the frame.
- Press the shutter while continuing to track the subject’s motion.
It may take several attempts to get the timing and motion just right, but the results can be striking.
Tips for Improving Your Motion Blur Photography
- Plan your shot: Scout locations and anticipate the direction and speed of movement.
- Use burst mode: Capture multiple frames in quick succession to increase your chances of getting the perfect shot.
- Control lighting: Overcast days or shooting at dawn/dusk make it easier to use slower shutter speeds without overexposing.
- Experiment with different subjects: Try photographing water, traffic, crowds, or even handheld abstract shots to see how different motions affect the final image.
- Edit carefully: Use post-processing to enhance contrast, adjust colors, or crop for better composition, but avoid over-sharpening which can ruin the effect.
For more technical advice on camera settings, the motion blur settings for beginners guide offers a detailed breakdown of recommended parameters for various scenarios.
Common Mistakes and How to Avoid Them
- Unintentional camera shake: Always stabilize your camera unless you want the entire image to be blurred.
- Overexposed images: Use ND filters or shoot in lower light to prevent blown highlights when using long exposures.
- Subject not sharp enough in panning shots: Practice your timing and movement, and use continuous autofocus if available.
- Forgetting to review results: Check your images on the camera’s screen and zoom in to assess sharpness and blur before moving on.
Inspiration and Advanced Techniques
Once you’ve mastered the basics, explore more advanced creative options. Try combining multiple exposures, using intentional camera movement (ICM), or blending sharp and blurred elements in post-processing. For a deeper dive into studio setups and advanced methods, this comprehensive guide to mastering motion blur in studio photography offers expert insights and examples.
Looking for more creative ideas? Browse the motion blur creative inspiration collection to see how artists push the boundaries of this technique.
FAQ
What shutter speed should I use for motion blur?
The ideal shutter speed depends on your subject’s speed and the effect you want. For fast-moving subjects like cars or runners, try 1/30s to 1/60s. For slower movement, such as flowing water, exposures of 1 second or longer may be needed. Experiment and adjust based on your results.
Do I need a tripod for motion blur photography?
While a tripod is highly recommended for sharp stationary elements and long exposures, you can also handhold the camera for creative blur or when panning. If you don’t have a tripod, use a stable surface to minimize camera shake.
Can I create motion blur with a smartphone?
Many modern smartphones offer manual or “pro” modes that let you adjust shutter speed. You can use these settings to experiment with blurred motion, especially in low-light conditions. Consider using a tripod or phone holder for best results.