
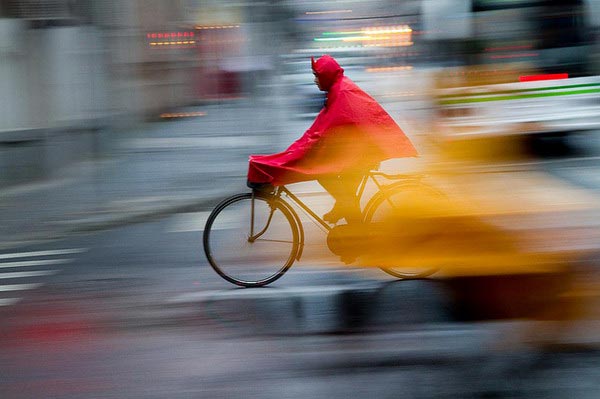
Capturing dynamic movement in photography often comes down to mastering the art of panning for motion blur. This technique lets you freeze a moving subject while blurring the background, creating a sense of speed and energy in your images. Whether you’re photographing cars, cyclists, runners, or even wildlife, learning how to pan effectively can elevate your work and help you stand out.
In this guide, you’ll discover the essential steps, camera settings, and practical tips to achieve smooth, professional-looking motion blur. We’ll also highlight common mistakes to avoid and point you to further resources for creative inspiration and technical mastery.
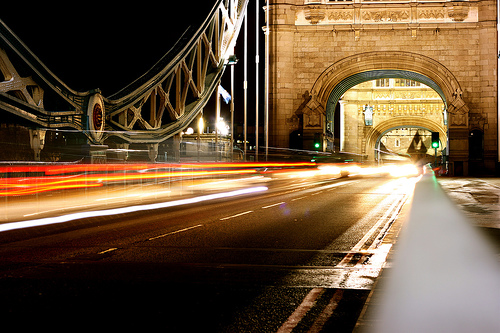
If you’re looking for more visual ideas, check out these motion blur composition examples to spark your creativity before diving into the technique itself.
Understanding the Panning Technique for Motion Blur
Panning is a photographic method where you move your camera horizontally in sync with a moving subject. The goal is to keep the subject sharp while the background becomes a streaky blur, emphasizing motion. This effect is commonly used in sports, automotive, and street photography to convey speed and direction.
When you pan correctly, the subject remains relatively crisp, while the background and sometimes the foreground show lines of motion. This contrast between sharpness and blur is what gives panning images their unique energy.
Essential Gear and Camera Settings for Panning
While you can try panning with almost any camera, certain gear and settings will make the process smoother and your results more consistent. Here’s what you need to know:
- Camera: Any DSLR, mirrorless, or advanced compact camera with manual or shutter priority mode will work.
- Lens: A zoom lens (such as 70-200mm or 24-105mm) gives you flexibility to frame your subject at different distances.
- Shutter Speed: The key to motion blur is using a slower shutter speed. Start with 1/30s to 1/60s for fast-moving subjects, and experiment with even slower speeds (1/15s or 1/8s) for dramatic effects.
- Focus Mode: Use continuous autofocus (AI Servo/AF-C) to track your subject as it moves.
- Drive Mode: Set your camera to burst or continuous shooting mode to increase your chances of capturing the perfect moment.
- Image Stabilization: If your lens or camera has stabilization, use the panning mode (often marked as “Mode 2”) to help reduce vertical shake while allowing horizontal movement.
For a deeper dive into camera settings, the motion blur settings for beginners guide offers step-by-step advice tailored to newcomers.
Step-by-Step Guide: How to Pan for Motion Blur
Getting a smooth, blurred background with a sharp subject takes practice. Follow these steps to improve your results:
- Choose Your Subject: Pick something moving at a steady pace, like a cyclist or car. Subjects moving parallel to your position are easiest to track.
- Position Yourself: Stand where you have a clear, unobstructed view of the subject’s path. Give yourself enough space to follow the motion smoothly.
- Set Your Camera: Switch to shutter priority (Tv or S mode) and select a slow shutter speed (start at 1/30s). Adjust ISO and aperture as needed for proper exposure.
- Pre-focus: Half-press the shutter or use back-button focus to lock onto your subject as it approaches.
- Follow the Motion: As the subject enters your frame, move your camera horizontally, matching their speed. Keep your feet planted and rotate your upper body for a smoother pan.
- Take the Shot: Press the shutter while continuing to pan. Keep moving the camera even after the shot to avoid abrupt stops that can cause unwanted blur.
- Review and Adjust: Check your images. If the subject is too blurry, increase your shutter speed. If the background isn’t blurred enough, slow it down. Repeat and refine your technique.
Tips for Consistent Results When Panning
Even with the right settings, panning takes patience and practice. Here are some proven tips to help you master the technique:
- Practice with Predictable Subjects: Start with vehicles or runners on a track, as their movement is easier to anticipate.
- Keep Your Movements Smooth: Avoid jerky motions. Use your hips and shoulders to rotate, not just your arms.
- Use a Monopod: For added stability, a monopod can help keep your camera level while allowing horizontal movement.
- Experiment with Shutter Speeds: Try different speeds to see how they affect the amount of blur. Each subject and scene may require a unique approach.
- Take Multiple Shots: Use burst mode to capture several frames in one pass. This increases your chances of getting a perfectly sharp subject.
- Review and Learn: Analyze your images to see what worked and what didn’t. Small adjustments can make a big difference.
Creative Uses and Inspiration for Motion Blur
Panning isn’t just for sports or racing. It can add drama and energy to street scenes, wildlife photography, or even portraits. For more ideas, explore the motion blur creative inspiration resource, which showcases how artists use this technique in unexpected ways.
Additionally, seeing motion blur before and after examples can help you understand the impact of panning and inspire you to experiment with your own style.
Common Mistakes to Avoid When Panning
Even experienced photographers can struggle with panning. Here are some frequent pitfalls and how to avoid them:
- Shutter Speed Too Fast: If your shutter is too quick, you’ll freeze both the subject and the background, losing the sense of motion.
- Shutter Speed Too Slow: Extremely slow speeds can make your subject unrecognizable. Find the right balance for your scene.
- Inconsistent Panning: Jerky or uneven movement will result in double images or unwanted blur. Practice smooth, steady motion.
- Poor Focus: Make sure your autofocus is set to continuous tracking, and pre-focus when possible.
- Ignoring the Background: Busy or distracting backgrounds can ruin the effect. Look for clean, simple backgrounds that enhance the blur.
Advanced Techniques and Further Learning
Once you’re comfortable with the basics, try experimenting with creative angles, multiple subjects, or incorporating foreground elements for added depth. Studio photographers can also use controlled lighting to combine panning with flash for unique effects—see this in-depth guide to mastering motion blur in studio photography for more on this approach.
For a cinematic approach, the motion blur cinematic photography guide offers tips for storytelling and mood using motion blur in your compositions.
FAQ
What is the ideal shutter speed for panning to create motion blur?
The best shutter speed depends on your subject’s speed and distance. For fast-moving vehicles, start with 1/30s to 1/60s. For slower subjects, try 1/15s or even 1/8s. Adjust based on your results and the amount of blur you want in the background.
Can I pan for motion blur without a tripod?
Yes, you can achieve great results handheld, especially with practice. However, using a monopod can help stabilize your movement and reduce vertical shake, making it easier to get sharp subjects and smooth backgrounds.
How do I keep my subject sharp while the background is blurred?
The key is to match your camera’s movement with the subject’s speed and direction. Use continuous autofocus to track the subject, and keep your panning motion as smooth as possible. Taking multiple shots in burst mode increases your chances of getting a perfectly sharp image.