
Motion blur black and white photography offers a unique way to capture the energy, emotion, and movement within a scene. By combining the timeless appeal of monochrome imagery with the dynamic qualities of blurred motion, photographers can create compelling visuals that stand out. Whether you’re just starting out or looking to refine your technique, understanding the fundamentals of motion blur in a black and white context will help you produce more evocative and artistic images.
This guide explores essential techniques, camera settings, and creative ideas for achieving stunning results. You’ll also find inspiration and practical advice to help you develop your own style. For those interested in seeing how different approaches can transform a scene, you might want to explore motion blur before and after examples for additional insight.
Understanding Motion Blur in Monochrome Images
At its core, motion blur is the visible streaking or smearing of moving subjects within a photograph. In black and white photography, this effect can be especially striking, as the absence of color draws attention to shapes, lines, and contrasts. The interplay between sharp and blurred elements can evoke a sense of time passing or highlight the rhythm of a bustling environment.
To achieve this effect, you’ll need to use slower shutter speeds, allowing moving subjects to leave trails across the frame. The degree of blur depends on both the speed of the subject and the duration of the exposure. Experimenting with different combinations will help you find the right balance for your artistic vision.
Essential Camera Settings for Capturing Motion
Mastering the technical side of motion blur black and white photography starts with understanding your camera’s settings. Here are the key factors to consider:
- Shutter Speed: The slower the shutter speed, the more pronounced the blur. Start with speeds between 1/15 and 1 second, adjusting based on how fast your subject is moving.
- Aperture: Use a smaller aperture (higher f-number) to compensate for the increased light entering during longer exposures. This also helps maintain sharpness in static areas of the image.
- ISO: Keep ISO as low as possible to minimize noise, which can be more noticeable in black and white images.
- Tripod: To keep stationary parts of the scene sharp, use a tripod to stabilize your camera during longer exposures.
For those new to these concepts, the motion blur settings for beginners guide provides a more detailed breakdown of how to set up your camera for best results.
Creative Approaches to Motion Blur in Black and White
There are several ways to incorporate motion blur into your monochrome photography, each offering distinct visual effects:
- Intentional Camera Movement (ICM): Move your camera during the exposure to create abstract patterns and dynamic compositions.
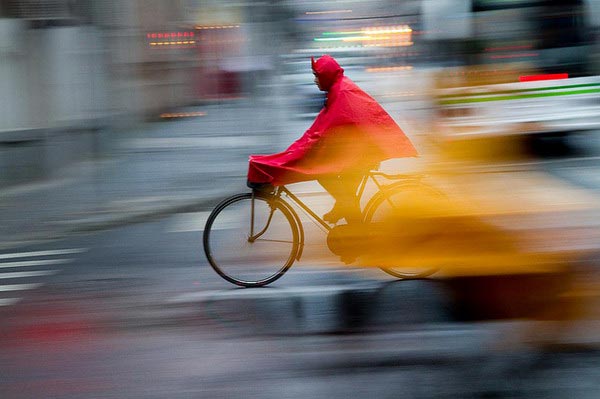
- Panning: Track a moving subject with your camera while using a slower shutter speed. This keeps the subject relatively sharp while blurring the background, emphasizing speed and direction.
- Long Exposures: Use extended shutter times to capture the flow of water, clouds, or crowds, resulting in smooth, ethereal effects.
- Multiple Exposures: Combine several exposures in-camera or during post-processing to layer different moments of movement into a single frame.
Experimenting with these methods can lead to unexpected and visually arresting results. For more inspiration, check out motion blur creative inspiration to see how artists use these techniques in their work.
Optimizing Contrast and Tonality
Black and white images rely heavily on contrast, texture, and tonal range to convey mood and structure. When working with motion blur, pay close attention to how light and shadow interact within your frame. Here are some tips:
- Pre-visualize in Monochrome: Many cameras offer a black and white preview mode. Use this to help compose your shot and judge how motion will affect the final image.
- Adjust in Post-Processing: Fine-tune contrast, brightness, and clarity to enhance the separation between blurred and static elements.
- Highlight Textures: Use motion to soften certain areas while keeping key textures sharp, drawing the viewer’s eye to your subject.
Common Subjects and Scene Ideas
Some scenes naturally lend themselves to motion blur in a monochrome palette. Here are a few suggestions to get started:
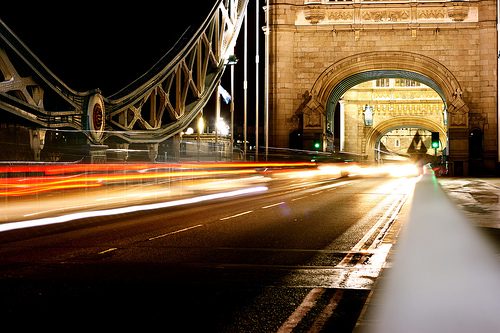
- Urban Life: Capture the movement of people, vehicles, or bicycles on busy streets. The contrast between still architecture and blurred figures can create a sense of urban rhythm.
- Nature: Flowing water, wind-blown trees, or flocks of birds in flight are all excellent subjects for exploring dynamic motion.
- Sports and Dance: Freeze a dancer’s leap or an athlete’s sprint with just enough blur to suggest energy and momentum.
- Weather: Rain, snow, or fog can be used to add atmosphere and mood, especially when combined with moving subjects.
For more ideas on how to compose these scenes, the motion blur composition examples resource provides a range of sample images and breakdowns.
Studio and Controlled Lighting Techniques
While much of motion blur black and white photography is shot outdoors, studio environments offer additional creative control. By manipulating lighting and background, you can isolate your subject and experiment with different types of movement. For a deeper dive into these methods, see this comprehensive guide to mastering motion blur in studio photography.
Using strobes or continuous lights, you can freeze certain parts of your subject while allowing other areas to blur, resulting in images that balance clarity with movement. Experiment with light placement and intensity to shape the mood of your photographs.
Post-Processing Tips for Monochrome Motion Blur
Editing plays a significant role in refining your images. Here are some post-processing tips to enhance your black and white motion blur shots:
- Convert to Black and White Carefully: Use software tools to adjust the color channels, maximizing contrast and detail in the final image.
- Selective Sharpening: Apply sharpening only to static areas to emphasize the difference between blurred and sharp regions.
- Noise Reduction: Longer exposures can introduce noise, especially in shadows. Use noise reduction tools to keep your images clean.
- Dodge and Burn: Lighten or darken specific areas to guide the viewer’s eye and enhance the sense of depth.
Frequently Asked Questions
What shutter speed should I use for motion blur in black and white photos?
The ideal shutter speed depends on your subject’s speed and the amount of blur you want. Generally, speeds between 1/15 and 1 second work well for most situations. Faster subjects may require shorter exposures, while slower-moving elements benefit from longer shutter speeds. Experiment to find the right balance for your scene.
How can I avoid unwanted camera shake when using slow shutter speeds?
To minimize camera shake, use a sturdy tripod and, if possible, a remote shutter release or your camera’s timer function. This ensures that only the moving elements in your scene are blurred, while stationary objects remain sharp.
Is it better to shoot in color and convert to black and white later?
Shooting in color and converting to black and white during post-processing gives you more control over tonal adjustments. You can fine-tune the way different colors translate to shades of gray, enhancing contrast and detail in your final image. However, some cameras offer high-quality monochrome modes that can help you visualize the end result while shooting.
Conclusion
Exploring motion blur black and white photography opens up new creative possibilities for photographers at any skill level. By understanding camera settings, experimenting with different techniques, and paying attention to contrast and composition, you can produce images that are both dynamic and timeless. Use the tips and resources in this guide as a starting point, and don’t hesitate to try new approaches as you develop your own vision.