
Mastering motion blur practice exercises is an essential step for photographers aiming to capture the dynamic energy of moving subjects. Whether you are new to photography or looking to refine your creative skills, learning how to control and use motion blur can add depth, drama, and storytelling to your images. This guide will introduce practical exercises, tips, and techniques to help you build confidence and consistency when working with motion blur.
Before diving into hands-on activities, it’s helpful to understand the basics of motion blur and how it can transform ordinary scenes into visually compelling photographs. If you’re seeking inspiration or want to see how others have approached this style, explore these motion blur composition examples for a variety of creative ideas.
Understanding the Fundamentals of Motion Blur
At its core, motion blur occurs when a moving subject is captured with a slower shutter speed, causing parts of the image to appear smeared or streaked. This effect can be used intentionally to convey speed, movement, or the passage of time. The key factors influencing motion blur are:
- Shutter speed: Slower speeds (e.g., 1/30s or longer) increase blur; faster speeds freeze action.
- Subject movement: The speed and direction of your subject impact the amount and direction of blur.
- Camera stability: Handheld shots may introduce camera shake, while a tripod keeps stationary elements sharp.
For a deeper dive into the science and visual impact of motion blur, check out this comprehensive explanation of motion blur and its effect on visuals.
Essential Gear and Settings for Motion Blur Exercises
Before starting your practice sessions, make sure you have the right tools and camera settings. Here’s what you’ll need:
- Camera with manual mode: Allows control over shutter speed and aperture.
- Tripod: Essential for keeping the camera steady during long exposures.
- Neutral density (ND) filter: Useful for shooting in bright conditions with slow shutter speeds.
- Remote shutter release: Helps minimize camera shake during exposures.
Set your camera to manual or shutter priority mode. Start with a shutter speed between 1/15s and 1/2s, and adjust as needed based on the speed of your subject and available light. If you’re just starting out, the motion blur settings for beginners guide offers step-by-step advice for dialing in your exposure.
Foundational Motion Blur Practice Exercises
To build your skills, try these practical activities designed to help you experiment with different types of motion and blur effects. Each exercise focuses on a specific aspect of capturing movement.
1. Capturing Moving Water
Find a stream, fountain, or waterfall. Set up your tripod and use a slow shutter speed (1/4s to several seconds) to smooth out the water’s motion. Notice how the water transforms from sharp droplets to silky flows as you lengthen the exposure.

- Experiment with different shutter speeds to see how the texture of the water changes.
- Try including stationary objects (like rocks or trees) for contrast.
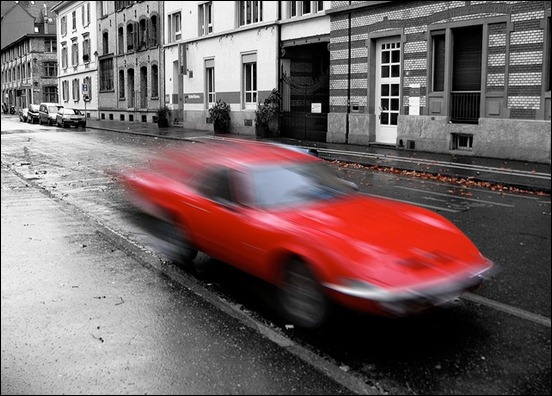
2. Panning with Moving Subjects
Panning is a classic technique for isolating a moving subject against a blurred background. Stand beside a road or path and follow a cyclist, runner, or car as it passes by. Use a shutter speed between 1/30s and 1/60s, and move your camera smoothly in sync with the subject’s movement.
- Keep the subject as sharp as possible while allowing the background to blur.
- Practice timing your shutter release for best results.
For more creative ideas, see the motion blur creative inspiration resource.
3. Light Trails at Night
City streets at night offer perfect opportunities to practice long exposure techniques. Set up your tripod and use a shutter speed of several seconds to capture the trails of car headlights and taillights. Adjust your ISO and aperture to balance exposure.
- Look for intersections or curved roads for more dynamic light patterns.
- Try including architectural elements or people for added context.
Advanced Exercises for Creative Motion Blur
Once you’re comfortable with the basics, challenge yourself with these more advanced activities. These exercises encourage experimentation and personal expression.
Intentional Camera Movement (ICM)
Instead of keeping your camera still, deliberately move it during the exposure. Try vertical or horizontal sweeps, rotations, or even zooming the lens while the shutter is open. Use shutter speeds from 1/4s to 2s for best results.
- Photograph trees, city lights, or colorful scenes for abstract effects.
- Review your images and adjust movement speed and direction for different results.
Combining Sharpness and Blur
Experiment with scenes that mix moving and stationary elements. For example, photograph a busy street where people are walking but some are standing still. Use a tripod and a shutter speed around 1/2s to 1s. The result will be a blend of ghostly figures and sharp details.
- Try using rear curtain sync flash to freeze part of the action at the end of the exposure.
- Explore different locations and times of day for varied lighting and effects.
Reviewing and Refining Your Results
After each session, review your images to identify what worked and what could be improved. Pay attention to:
- How well the blur conveys motion or emotion.
- Whether the subject stands out or is lost in the effect.
- The balance between sharp and blurred areas.
Comparing your before and after shots can help you track your progress. For more side-by-side examples, visit the motion blur before and after examples guide.
Common Challenges and How to Overcome Them
Working with motion blur can be unpredictable, especially in changing light or with fast-moving subjects. Here are some tips for overcoming common issues:
- Unwanted camera shake: Use a tripod and remote shutter release.
- Overexposed images: Lower your ISO, use a smaller aperture, or add an ND filter.
- Subject not sharp enough: Practice your panning technique or increase shutter speed slightly.
- Too much or too little blur: Adjust your shutter speed incrementally until you achieve the desired effect.
Patience and practice are key. Each session will help you gain more control and creative freedom with motion blur techniques.
Frequently Asked Questions
What is the ideal shutter speed for motion blur exercises?
The best shutter speed depends on your subject and desired effect. For gentle blur, start around 1/30s to 1/60s. For more pronounced streaks or light trails, use slower speeds such as 1/4s, 1s, or even longer. Experiment to find what works best for each scenario.
Do I always need a tripod for motion blur photography?
A tripod is highly recommended for long exposures or when you want stationary elements to remain sharp. For panning or intentional camera movement, you can shoot handheld, but stability is still important for consistent results.
How can I use motion blur creatively in my photography?
Motion blur can be used to convey speed, emotion, or atmosphere. Try panning with moving subjects, capturing light trails, or experimenting with intentional camera movement for abstract effects. Look for scenes with both moving and still elements to create visual contrast and interest.
For more inspiration and guidance, explore the motion blur cinematic photography guide for tips on using these techniques in storytelling and creative projects.