When editing photos or creating digital art, understanding the differences between motion blur and radial blur can help you make the most of your creative options. Both effects add a sense of movement, but they do so in distinct ways and are suited for different visual goals. Whether you’re a photographer, designer, or hobbyist, knowing when to use each blur can elevate your images and help you tell a stronger visual story.
This guide breaks down the characteristics, best uses, and practical tips for both types of blur. If you’re looking for more inspiration on dynamic compositions, check out these motion blur composition examples for creative ideas.
Understanding the Difference Between Motion and Radial Blur
Both motion blur and radial blur are popular effects in photography and digital editing, but they serve different purposes. The main distinction lies in the direction and pattern of the blur:
- Motion blur simulates the streaking of objects as they move quickly in a straight or slightly curved path. It’s often used to convey speed, direction, or the passage of time.
- Radial blur creates a circular or spinning effect, radiating from a central point. This effect mimics rotation or zooming in/out, making it ideal for emphasizing a focal point or creating a sense of vortex-like movement.
Choosing between these effects depends on the story you want your image to tell and the type of movement you wish to convey.
When to Use Motion Blur in Your Images
Applying motion blur is a powerful way to add drama and energy to your visuals. This effect is commonly used in sports photography, automotive shots, and scenes where you want to highlight movement along a path. It can also be used creatively in portraits or street photography to suggest hustle and bustle or to isolate a subject against a blurred background.

Some practical scenarios for using this effect include:
- Capturing moving vehicles to emphasize speed
- Photographing athletes in action
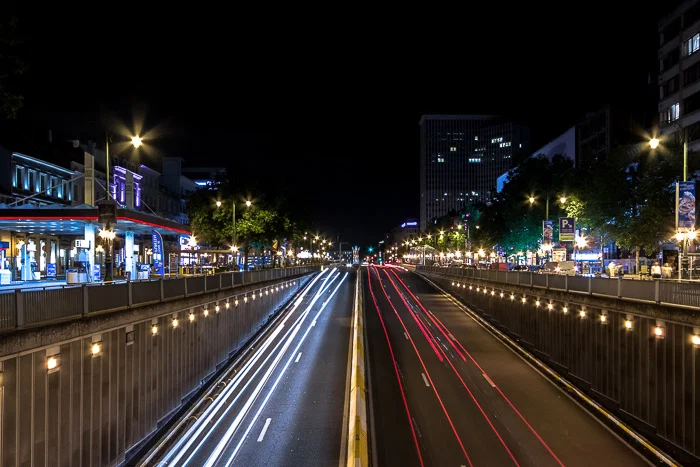
- Adding dynamic streaks to light trails in night photography
- Simulating panning shots in post-processing
For those new to this technique, the motion blur settings for beginners guide provides step-by-step instructions on achieving the look both in-camera and with editing software.
Creative Uses for Radial Blur Effects
Unlike linear blur, radial blur is perfect for images where you want to draw attention to a central point or create a sense of spinning or zooming motion. This effect is often used in creative portraiture, product photography, and abstract art. It’s also a favorite for simulating the look of fast-moving objects coming toward or away from the viewer, such as a spinning wheel or a zoom burst effect in cityscapes.
Common applications include:
- Highlighting a subject by blurring the surroundings in a circular pattern
- Simulating the effect of spinning objects, such as bicycle wheels or carnival rides
- Creating dramatic zoom effects in landscapes or city scenes
- Adding a surreal or dreamlike quality to creative projects
Experimenting with the amount and center point of the blur can help you achieve subtle emphasis or bold, eye-catching effects.
Comparing Motion Blur and Radial Blur: Key Considerations
When deciding between these two blur effects, consider the following factors:
| Aspect | Motion Blur | Radial Blur |
|---|---|---|
| Direction | Linear or slightly curved | Circular or spiral |
| Best For | Conveying speed, direction, or movement along a path | Emphasizing a central point, simulating spinning or zooming |
| Typical Use Cases | Sports, vehicles, street scenes, light trails | Portraits, product shots, creative abstracts, zoom effects |
| Editing Tools | Motion blur filter, panning technique | Radial blur filter, zoom burst technique |
Understanding these distinctions helps you select the right effect for your creative vision and ensures your images communicate the intended mood and movement.
Tips for Applying Blur Effects in Editing Software
Most photo editing programs, such as Adobe Photoshop, GIMP, and mobile apps, offer both motion and radial blur filters. Here are some practical tips for getting the best results:
- Use layer masks to control where the blur appears, keeping key details sharp.
- Adjust the strength of the blur gradually to avoid over-processing.
- Combine both effects for unique looks, such as adding motion blur to a spinning object for a more dynamic feel.
- Preview changes at different zoom levels to ensure the effect looks natural.
For a deeper dive into creative uses, the motion blur creative inspiration for artists article offers ideas and advanced techniques.
Common Mistakes and How to Avoid Them
While blur effects can add excitement and focus to your images, overusing them or applying them incorrectly can lead to unnatural results. Here are some pitfalls to watch out for:
- Over-blurring the entire image, which can make subjects unrecognizable
- Inconsistent direction of blur, which can confuse the viewer’s sense of motion
- Ignoring the light source, resulting in unrealistic highlights and shadows
- Applying blur to areas that should remain sharp, such as eyes in a portrait
Review your edits at full size and compare before-and-after versions. The motion blur before and after examples guide showcases how subtle adjustments can make a big difference.
Expert Insights and Further Learning
Mastering blur effects takes practice and a good understanding of composition. For those interested in advanced techniques, the motion blur cinematic photography guide explores how these effects are used in film and high-end photography to create atmosphere and emotion.
If you want to learn more about capturing these effects in-camera, this comprehensive guide to mastering motion blur photography covers settings, equipment, and creative approaches for both beginners and experienced photographers.
FAQ
What is the main difference between motion blur and radial blur?
The primary difference lies in the direction of the blur. Motion blur creates streaks in a linear or slightly curved path, simulating movement across the frame. Radial blur, on the other hand, radiates out from a central point, mimicking spinning or zooming effects.
Can I combine both blur effects in one image?
Yes, combining both effects can produce creative and dynamic results. For example, you might use motion blur on a background while applying radial blur to a spinning object in the foreground. The key is to use masks and layers to control where each effect appears.
Which blur effect is best for emphasizing a subject?
Radial blur is often used to draw attention to a central subject by blurring the surroundings in a circular pattern. However, motion blur can also isolate a subject by blurring the background along a specific direction. The best choice depends on the type of movement and the story you want to tell.